Difference between revisions of "Devil's Catacomb"
| [checked revision] | [checked revision] |
m (Bot: Adding ae, nl, pt, ro; modifying cz) |
|||
| Line 6: | Line 6: | ||
|Description = | |Description = | ||
| − | + | The Devil's Catacomb was introduced first at 15.11.2011. It had until 07.09.2021 a total of 7 floors, but the old 4th floor has been removed. It was a maze with 6 different shapes and only one was correct. The Devil's Catacomb is a very famous [[Rank|ranking]] place and also the loot of [[Yang]] drop is high.<br><br> | |
| − | + | To be able to enter this dungeon, you must have finished the [[Demon Tower]] once. You also need a minumum level of 75. You can then talk to [[Catacomb Guard]] in [[Hwang Temple]]. From floor 3 upwards, all group members need a {{Ti|Shrunken Head|width=2}} in their inventory.<br><br> | |
| − | + | To leave this map, you simply have to press "restart city" and you are back in Hwang Temple. However, there is a 30 minute cooldown before you can re-enter. You have a total of 1 hour to complete the run, starting from floor 2. | |
| − | + | <br><br><br> | |
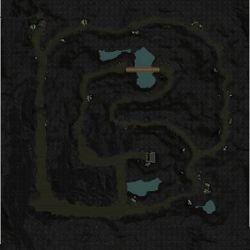
| − | + | *'''First floor''' | |
| − | + | You have to bring {{Ti|Soul Crystal Key}}, which can be found from the monsters on that floor, to the {{Tm|Kud Statue}} which is located in the center of the map. When you do this, all players in your group will be teleported to floor 2. | |
| − | + | <br><br> | |
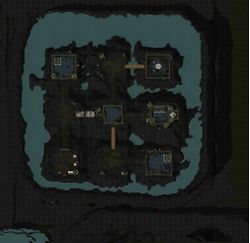
| − | + | *'''Second floor''' | |
| − | + | You must find your way to the middle. But [[Gate of Perdition]] are blocking your way. You must destroy them to pass. Once you are in the middle of the map, talk with {{Tm|Tortoise Rock}} and all players who have a [[Shrunken Head]] will be teleported to the third floor. | |
| − | + | <br><br> | |
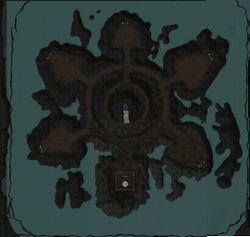
| − | + | *'''Third floor''' | |
| − | + | You entered a map with 7 [[Metin of Retribution]] spawned across the map. Only one of them is real. Destroy one by one to find the real Metin. | |
| − | + | <br><br> | |
| − | + | *'''Fourth floor''' | |
| − | + | You have to find {{Tm|Tartaros}} but he is hiding in one of the corners. When you kill him, he will drop a {{Ti|Grimace Totem}}. Bring this item to {{Tm|Basalt Obelisk}} which is located in the center of the map. | |
| − | + | <br><br> | |
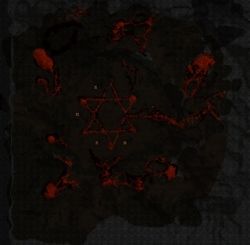
| − | + | *'''Fifth floor''' | |
| − | + | You must eliminate all monsters in that area. Watch out for the boss {{Tm|Charon}} as his members will push you away. | |
| − | + | <br><br> | |
| − | + | *'''Sixth floor''' | |
| − | + | On the final floor your main objective is to kill {{Tm|Azrael}}. But the room is full of monsters who attack you automatically. When you have killed all monsters, you will be teleported short after. | |
| − | |||
| − | |||
| − | |||
| − | ''' | ||
| − | |||
| − | |||
| − | |||
| − | |||
| − | |||
| − | |||
| − | ''' | ||
| − | |||
| − | |||
| − | |||
| − | |||
| − | |||
| − | |||
| − | |||
| − | |||
| − | |||
| − | |||
| − | |||
| − | |||
| − | |||
| − | |||
| − | |||
| − | |||
| − | |||
| − | |||
| − | ''' | ||
| − | |||
| − | |||
| − | |||
| − | |||
| − | |||
| − | |||
| − | ''' | ||
| − | |||
| − | |||
| − | |||
| − | |||
| − | |||
| − | |||
| − | ''' | ||
| − | |||
| − | |||
| − | |||
| − | |||
|Areas= | |Areas= | ||
| − | |||
|Old Man= | |Old Man= | ||
| Line 86: | Line 37: | ||
|Metins = | |Metins = | ||
| − | *[[Metin of | + | *[[Metin of Retribution]] |
|NPC = | |NPC = | ||
| − | *[[ | + | *[[Kud Statue]] (floor 1) |
| − | *[[Tortoise Rock]] | + | *[[Peddler]] (floor 2) |
| − | *[[ | + | *[[Tortoise Rock]] (floor 2) |
| + | *[[Basalt Obelisk]] (floor 4) | ||
|Monster = | |Monster = | ||
*[[Azrael's Spawn]] | *[[Azrael's Spawn]] | ||
*[[Double-head Hell Archer]] | *[[Double-head Hell Archer]] | ||
| − | *[[ | + | *[[Erebos]] |
| − | |||
| − | |||
| − | |||
| − | |||
| − | |||
| − | |||
*[[Gate of Perdition]] | *[[Gate of Perdition]] | ||
*[[Hell Archer]] | *[[Hell Archer]] | ||
| Line 108: | Line 54: | ||
*[[Hell Guard]] | *[[Hell Guard]] | ||
*[[Hell Hound]] | *[[Hell Hound]] | ||
| − | *[[Hell Major]] | + | *[[Hell Major]] |
| + | *[[Hell Priest]] | ||
*[[Hell Officer]] | *[[Hell Officer]] | ||
| − | |||
*[[Hell Slaughterer]] | *[[Hell Slaughterer]] | ||
*[[Hell Spearman]] | *[[Hell Spearman]] | ||
*[[Hell Warrior]] | *[[Hell Warrior]] | ||
| + | *[[Evil Hell Archer]] | ||
| + | *[[Evil Hell General]] | ||
| + | *[[Evil Hell Major]] | ||
| + | *[[Evil Hell Priest]] | ||
| + | *[[Evil Hell Slaughterer]] | ||
| + | *[[Evil Hell Spearman]] | ||
| + | *[[Evil Hell Warrior]] | ||
*[[Infernal Claw]] | *[[Infernal Claw]] | ||
| − | |||
*[[Zombie]] | *[[Zombie]] | ||
| + | *'''[[Tartaros]]''' | ||
| + | *'''[[Charon]]''' | ||
*'''[[Azrael]]''' | *'''[[Azrael]]''' | ||
| − | |||
| − | |||
| − | |||
|Map = | |Map = | ||
| − | ''' | + | '''Floor 1'''<br> |
| − | [[File:Devil's Catacomb 1.jpg| | + | [[File:Devil's Catacomb 1.jpg|250px|link=]]<br> |
| − | ''' | + | '''Floor 2'''<br> |
| − | [[File:Devil's Catacomb 2.jpg| | + | [[File:Devil's Catacomb 2.jpg|250px|link=]]<br> |
| − | ''' | + | '''Floor 3'''<br> |
| − | [[File:Devil's Catacomb 3.jpg| | + | [[File:Devil's Catacomb 3.jpg|250px|link=]]<br> |
| − | ''' | + | '''Floor 4'''<br> |
| − | [[File:Devil's Catacomb | + | [[File:Devil's Catacomb 5.jpg|250px|link=]]<br> |
| − | ''' | + | '''Floor 5'''<br> |
| − | [[File:Devil's Catacomb | + | [[File:Devil's Catacomb 6.jpg|250px|link=]]<br> |
| − | ''' | + | '''Floor 6'''<br> |
| − | + | [[File:Devil's Catacomb 7.jpg|link=]] | |
| − | |||
| − | [[File:Devil's Catacomb 7.jpg|link=]] | ||
|Map-1 = | |Map-1 = | ||
| Line 144: | Line 93: | ||
}} | }} | ||
| + | |||
| + | [[Category:Areas/neutral]] | ||
[[ae:سرداب الموتى]] | [[ae:سرداب الموتى]] | ||
Revision as of 01:06, 30 December 2021

|
INFORMATION |
The Devil's Catacomb was introduced first at 15.11.2011. It had until 07.09.2021 a total of 7 floors, but the old 4th floor has been removed. It was a maze with 6 different shapes and only one was correct. The Devil's Catacomb is a very famous ranking place and also the loot of Yang drop is high. To be able to enter this dungeon, you must have finished the Demon Tower once. You also need a minumum level of 75. You can then talk to Catacomb Guard in Hwang Temple. From floor 3 upwards, all group members need a
You entered a map with 7 Metin of Retribution spawned across the map. Only one of them is real. Destroy one by one to find the real Metin.
|
Interactive Map
|
||||||||
| Floor 1
|
||||||||||
|
||||||||||

| Other Information | ||||||
|
||||||
|
Adjacent areas
|
Old Man
|
Teleporter
|
||||
|
No adjacent areas to this map
|
You cannot reach this area via the Old Man
|
You cannot reach this area via the Teleporter
|
||||